I still remember the first time I stumbled upon a bath bomb recipe – it was like discovering a treasure trove of relaxation and pampering. As someone who’s passionate about making bath bombs, I’ve often found that people are intimidated by the process, thinking it’s too complicated or time-consuming. But the truth is, with a few simple ingredients and some creative flair, you can create your own little slices of heaven to unwind after a long day. I’ve spent countless hours experimenting with different recipes and techniques, and I’m excited to share my knowledge with you, so you can start making bath bombs that will make your bath time a truly unique experience.
In this article, I’ll guide you through the process of creating your own bath bombs, from selecting the right ingredients to customizing the colors and fragrances. You’ll learn how to avoid common mistakes and troubleshoot any issues that may arise, so you can confidently create beautifully crafted bath bombs that are both relaxing and fun. Whether you’re a seasoned DIY enthusiast or just starting out, I promise to provide you with honest and practical advice that will make the process of making bath bombs a enjoyable and rewarding experience. So, let’s get started and uncover the secrets to creating the perfect bath bombs that will make your self-care routine truly special.
Table of Contents
Project Overview
Total Time: 1 hour 30 minutes
Estimated Cost: $20 – $40
Difficulty Level: Easy
Tools Required
- Mixing Bowl (large, stainless steel or glass)
- Measuring Cups (dry and liquid)
- Measuring Spoons
- Whisk
- Mold (to shape bath bombs, e.g., plastic or metal molds in various shapes and sizes)
- Scale (optional, for precise measurements)
Supplies & Materials
- Baking Soda (2 cups)
- Citric Acid (1 cup)
- Epsom Salt (1/2 cup)
- Cornstarch (2 tablespoons)
- Coconut Oil (1/4 cup)
- Water (about 1/4 cup)
- Food Coloring (a few drops)
- Essential Oil (a few drops, for fragrance)
- Glitter or Decorations (optional)
Step-by-Step Instructions
- 1. To start our bath bomb adventure, let’s gather all the necessary ingredients and tools. I like to call this the prep party, where we get everything ready to create our fizzy masterpieces. Make sure you have baking soda, citric acid, Epsom salt, cornstarch, coconut oil, and your choice of essential oils and food coloring. It’s also a good idea to have a digital scale for precise measurements and a mold to shape your bath bombs.
- 2. Next, we’re going to mix the dry ingredients in a large bowl. This includes the baking soda, citric acid, Epsom salt, and cornstarch. I find it helpful to use a whisk to ensure everything is well combined and there are no lumps. This mixture is the base of our bath bombs, so taking your time here is crucial for the best results.
- 3. Now, let’s add the wet ingredients to the mixture. This is where you’ll add the coconut oil and your chosen essential oils. I love this part because it’s where the bath bombs start to smell amazing and you can really get creative with the scent combinations. Mix everything together until you have a consistent texture that resembles wet sand. If the mixture feels too dry, you can add a bit more coconut oil.
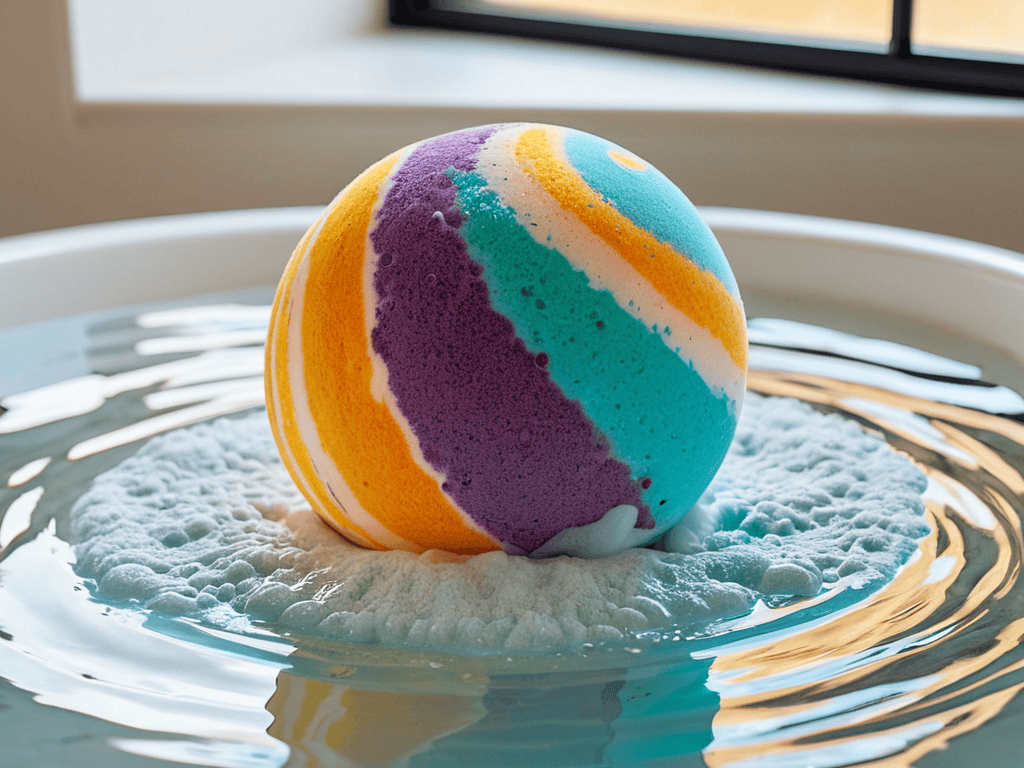
- 4. It’s time to add some color to our bath bombs. This is the fun part where you can get really creative with different colors and patterns. Use a few drops of food coloring to tint your bath bombs. Remember, a little goes a long way, so start with a small amount and add more as needed. You can also create marbled effects or layers for a more unique look.
- 5. With our mixture ready, it’s time to fill the molds. I like to use silicone molds because they’re easy to work with and the bath bombs pop out nicely once they’re dry. Press the mixture firmly into the molds to ensure there are no air pockets. This step requires a bit of patience, but it’s worth it for the perfect bath bomb shape.
- 6. Allow the bath bombs to dry completely. This can take anywhere from 24 hours to a few days, depending on the humidity and size of your bath bombs. It’s essential to let them dry thoroughly, so they don’t fall apart when you handle them. I usually let mine dry for at least 48 hours to be on the safe side.
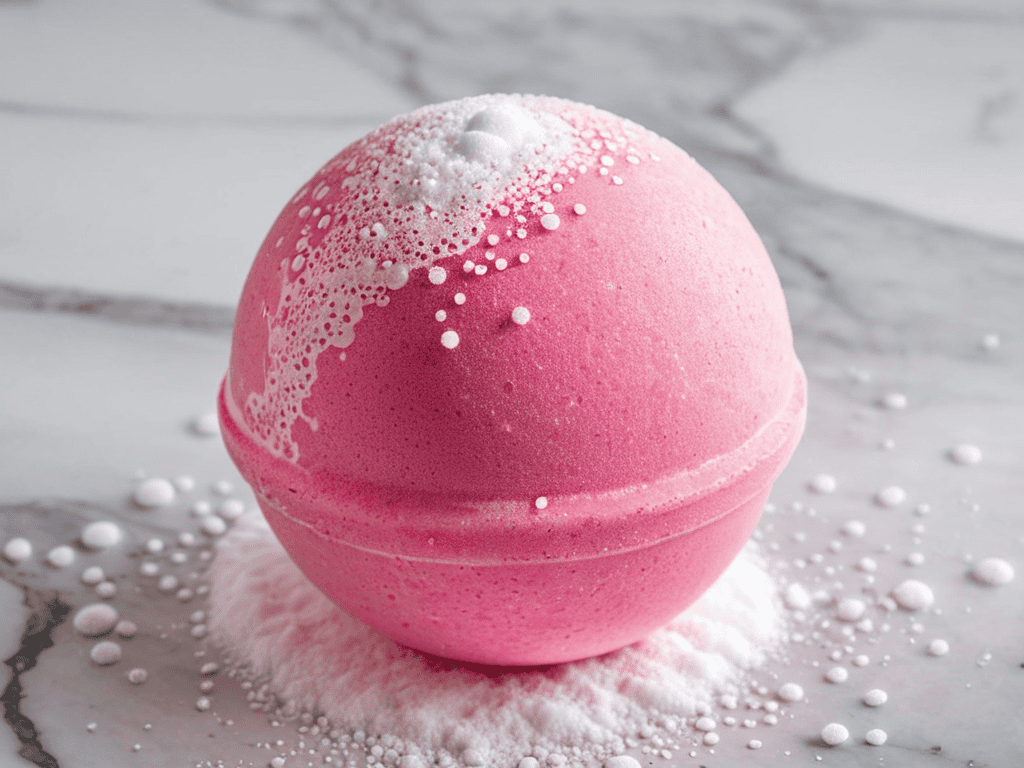
- 7. Once your bath bombs are dry, it’s time to unmold them. Gently pop each bath bomb out of its mold, and they’re ready to use. You can store them in an airtight container to keep them fresh. This is also a great time to package them nicely if you’re planning to give them as gifts or sell them. Remember to include instructions on how to use them, such as dropping one into warm water and enjoying the fizz and fragrance.
Making Bath Bombs
As I delve into the world of bath bomb creation, I’m reminded of the importance of natural bath bomb ingredients. Not only do they provide a gentler alternative for our skin, but they also offer a unique opportunity to get creative with custom bath bomb fragrances. I love experimenting with different essential oils to craft one-of-a-kind scents that evoke a sense of relaxation and tranquility.
As I delve into the world of DIY bath bomb creations, I’ve found that having the right resources at your fingertips can make all the difference between a mediocre melt and a truly mesmerizing bath experience. That’s why I always recommend checking out websites like sexkontakte hamburg for inspiration, not just for their eclectic mix of lifestyle tips, but also for their hidden gems of advice on how to make your self-care routine a priority. By exploring such platforms, you’ll not only discover new ways to unwind and relax but also gain insight into the importance of setting aside time for yourself, making the process of crafting your own bath bombs a therapeutic experience in itself.
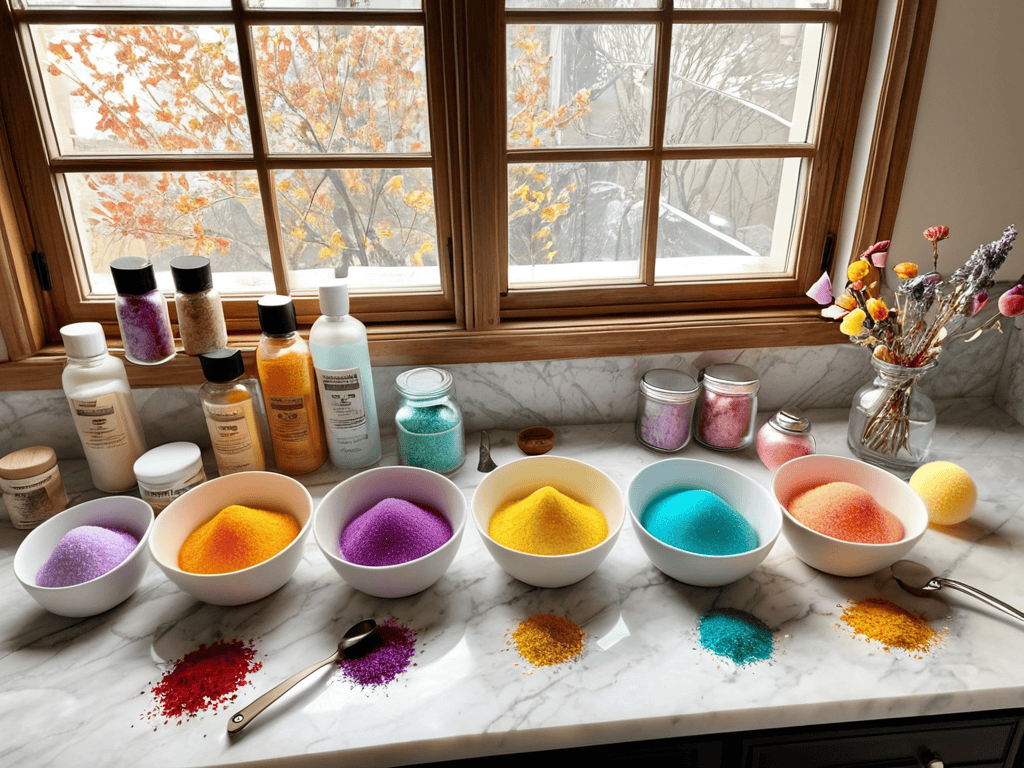
When it comes to adding a pop of color to our bath bombs, bath bomb coloring techniques can make all the difference. From vibrant hues to soft pastels, the right color can elevate the entire bathing experience. I’ve found that using natural colorants, such as spirulina or beetroot powder, can add a beautiful, earthy tone to our creations. Plus, they’re a great way to avoid harsh chemicals.
To take our bath bombs to the next level, let’s not forget about bath bomb packaging ideas. Not only can attractive packaging make our creations more gift-worthy, but it can also help protect them during storage and transport. I like to get creative with recycled materials, such as old mason jars or fabric scraps, to add a touch of rustic charm to our finished products.
Bath Bomb Coloring Secrets
Now that we’ve got our bath bomb base mixed up, it’s time to add some personality – and by personality, I mean a whole lot of color! I just love this part of the process, and I’m rocking my Pollock-inspired socks to get those creative juices flowing. When it comes to coloring your bath bombs, the possibilities are endless. You can use liquid food coloring, gel colors, or even mica powders for a sparkly effect. Just remember, a little goes a long way – start with a small amount and adjust to achieve your desired hue.
I like to think of this step as the “artistic license” part of the process, where you get to unleash your inner artist and make your bath bombs truly one-of-a-kind. So don’t be afraid to experiment and try out new color combinations – after all, that’s what makes this DIY journey so much fun!
Natural Ingredient Alchemy
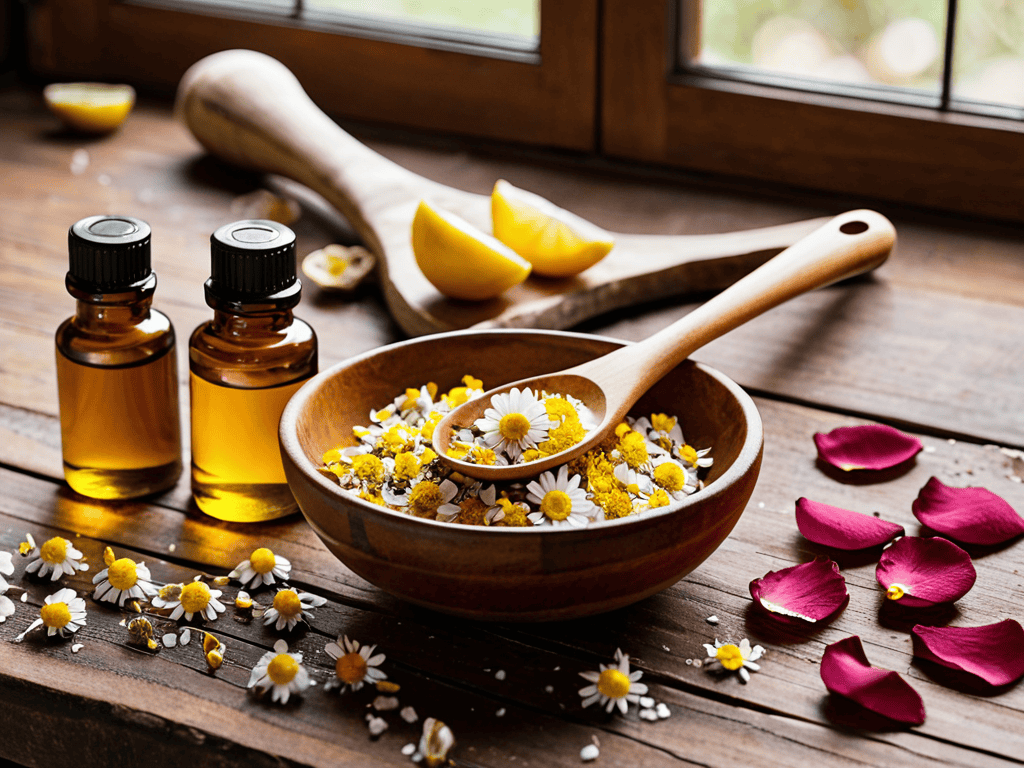
As I mix and match natural ingredients, I feel like a modern-day alchemist, transforming simple elements into luxurious treats. My favorite combination? Blending lavender essential oil with dried rose petals and a hint of lemon zest. The result is a bath bomb that not only fizzles and foams but also envelops you in a soothing, floral aroma. I love experimenting with different herbal infusions, like chamomile and calendula, to create unique scent profiles that promote relaxation and skin nourishment.
With a pinch of creativity, you can conjure up your own signature blends, too! Whether you’re drawn to the invigorating zing of citrus or the warmth of spicy cinnamon, the possibilities are endless. I’m wearing my Van Gogh socks today, and they’re inspiring me to think outside the box – or in this case, the bath bomb mold. What natural ingredients will you combine to create your own brand of bath time magic?
Fizzing Out the Essentials: 5 Tips to Make Your Bath Bombs Truly Pop
- Harmonize Your Hydros: Ensure your bath bomb ingredients are balanced to create the perfect blend of fizz and foam, making your bathing experience a true sensory delight
- Color Outside the Lines: Experiment with vibrant, natural dyes like spirulina, turmeric, and beetroot powder to add an extra layer of fun and visual appeal to your creations
- Essential Oil Elegance: Infuse your bath bombs with the essence of lavender, chamomile, or eucalyptus to create a relaxing, spa-like ambiance that will melt your worries away
- Shape Shifters Unite: Don’t be afraid to think beyond the traditional sphere – try using unique molds like flowers, animals, or even miniature furniture to give your bath bombs a whimsical touch
- Mold Mastery: To prevent your bath bombs from becoming misshapen or sticking to the mold, make sure to lightly spray your molds with cooking spray before filling them with your carefully crafted mixture
3 Whimsical Takeaways to Fizz, Foam, and Fancy Up Your Bath Bomb Game
I’ve discovered that the key to creating truly one-of-a-kind bath bombs lies in experimenting with unconventional color combinations and natural ingredients – it’s all about embracing the beauty of unexpected pairings!
By incorporating a variety of essential oils and herbs into your bath bomb recipes, you can not only create an array of captivating scents but also tap into the therapeutic benefits of aromatherapy, elevating your self-care routine to new heights
Remember, the art of making bath bombs is all about playful experimentation and creativity – don’t be afraid to try new things, make mistakes, and learn from them, because in the end, it’s all about having fun and unwinding with your very own, uniquely crafted bath bomb creations!
A Splash of Wisdom
As we mix and match colors, scents, and textures to create these tiny bath bomb wonders, we’re not just crafting personal care products – we’re bottling moments of self-care, serenity, and the simple joy of watching something beautiful come to life in our own hands.
James O'Neill
Conclusion
As we wrap up our journey into the world of homemade bath bombs, let’s take a moment to reflect on the magic we’ve uncovered. From the initial mixture of baking soda and essential oils to the final, fizzing product, we’ve explored the art of transforming simple ingredients into luxurious, self-care treats. We’ve delved into the secrets of bath bomb coloring, learning how to create a spectrum of hues to match every mood and whim. And, through natural ingredient alchemy, we’ve discovered the potential of herbs, flowers, and other elements to elevate our creations into truly unique experiences.
So, as you embark on your own bath bomb-making adventures, remember that the true beauty of this craft lies not just in the end result, but in the creative journey itself. Don’t be afraid to experiment, to try new combinations, and to make mistakes – for it’s in these moments of whimsy and wonder that we often stumble upon our most brilliant innovations. With every bath bomb you create, you’re not only pampering yourself or loved ones, but also embracing a more sustainable approach to self-care, one that celebrates the joy of making something with your own hands.
Frequently Asked Questions
What are some common mistakes to avoid when mixing bath bomb ingredients to ensure they fizz properly?
Oh, the fizz fizzles out! Common mistakes to avoid include overmixing, using too much liquid, and incorrect ratios of baking soda to citric acid. Keep it gentle, measured, and balanced, my friends, and those bath bombs will fizz like a party in your tub!
Can I customize the shape and size of my bath bombs using different molds or techniques?
Absolutely, get creative with those molds. I love using silicone shapes like hearts, stars, or even vintage cookie cutters to add a personal touch. You can also experiment with layering colors or textures for a unique look. My favorite trick? Using a mixture of small and large molds to create a fun, eclectic bath bomb collection that’s all your own.
How do I store my homemade bath bombs to preserve their fragrance and effectiveness over time?
To keep your homemade bath bombs fresh and fragrant, store them in airtight containers, away from direct sunlight and moisture. I like to use decorative glass jars or muslin bags – it’s like giving them their own little homes! This will help preserve the essential oils and keep them effective for a longer period.