I still remember the first time I encountered the concept of what is underlayment for flooring. I was working on a vintage furniture upcycling project, and my client insisted on installing new flooring to match the quirky, eclectic style of the pieces I had created. As I delved into the world of flooring, I was shocked by the amount of misinformation and overcomplication surrounding something as simple as underlayment. It seemed like every “expert” had a different opinion on the matter, and the prices for these so-called “magic” layers were through the roof. I realized that many people were being taken advantage of, and it was time to set the record straight.
As someone who’s passionate about making sustainable living accessible and fun, I want to assure you that breathing new life into your floors doesn’t have to be a daunting or expensive task. In this article, I’ll share my honest, experience-based advice on what underlayment for flooring really is, and how you can use it to enhance your space without breaking the bank. I’ll cut through the hype and provide you with practical tips and real-world examples to help you make informed decisions about your flooring projects. Whether you’re a seasoned DIY enthusiast or just starting out, I promise to guide you through the process with clarity, humor, and a dash of whimsy, just like I do with my colorful sock collection that inspires my upcycling adventures.
Table of Contents
- Unveiling Underlayment Secrets
- Breathing Life Into Hardwood With Underlayment Materials
- Laminate Floorings Best Friend Underlayment Options
- What Is Underlayment for Flooring
- Diy Delights Underlayment Installation Tips and Cost
- Thickness Matters for Concrete Subfloors and Tile
- Laying the Groundwork: 5 Essential Tips for Underlayment Success
- Key Takeaways to Revitalize Your Flooring
- The Heart of the Matter
- Bringing it All Together: The Underlayment Story
- Frequently Asked Questions
Unveiling Underlayment Secrets
As I delve into the world of underlayment, I’m reminded of my favorite upcycling projects, where a little creativity can turn a vintage piece into a modern masterpiece. When it comes to underlayment materials for hardwood floors, the options can be overwhelming, but I’ve found that a good rule of thumb is to choose materials that provide a smooth, even surface. This is especially important for DIY enthusiasts, as a well-prepared subfloor can make all the difference in the success of your project.
In my experience, the best underlayment for laminate flooring is often a matter of personal preference, but there are a few key factors to consider. For instance, underlayment thickness for concrete subfloors is crucial, as it can affect the overall stability and durability of your flooring. I’ve seen many a DIY project go awry due to inadequate underlayment, so it’s essential to do your research and choose the right materials for the job.
As I sit here, wearing my favorite pair of colorful socks featuring Vincent van Gogh, I’m inspired to think outside the box when it comes to underlayment options for tile installation. With a little creativity and some DIY underlayment installation tips, you can create a unique and functional space that reflects your personal style. And, as an added bonus, you can save on underlayment cost and budgeting by repurposing materials and getting crafty with your installation.
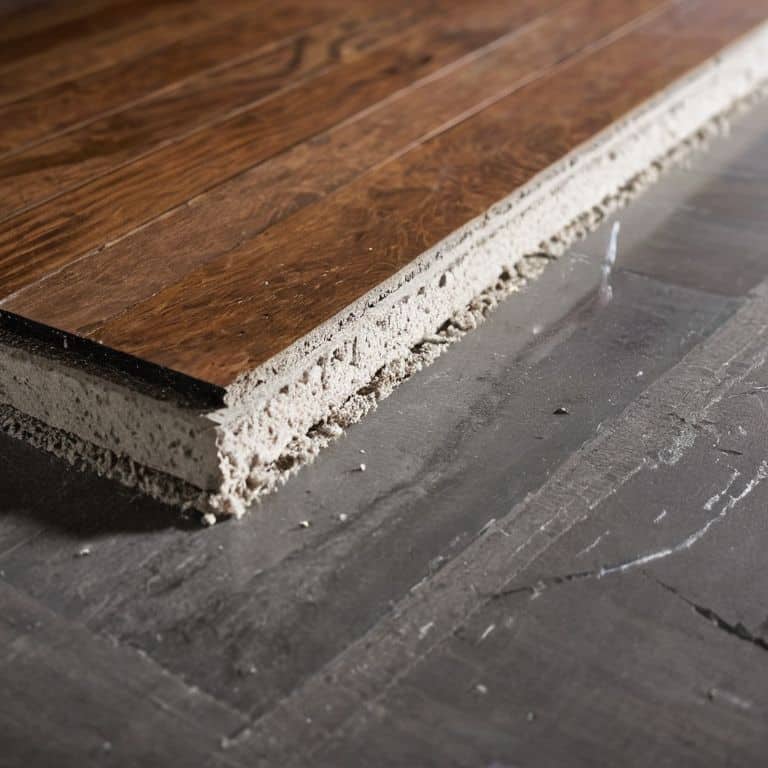
Breathing Life Into Hardwood With Underlayment Materials
When it comes to hardwood floors, the right underlayment can make all the difference. I’ve seen it time and time again – a beautiful hardwood floor, laid with precision, but lacking that extra oomph due to inadequate underlayment. This is where the magic happens, folks, and I’m excited to share my favorite tricks for breathing new life into these stunning floors.
By choosing the perfect underlayment material, you can ensure your hardwood floors are not only durable but also visually stunning. I always recommend considering the unique characteristics of your space, from foot traffic to ambient moisture levels, to select the ideal material. Whether you opt for cork, foam, or another type of underlayment, the key is to find the perfect balance that makes your floors shine with a warm glow.
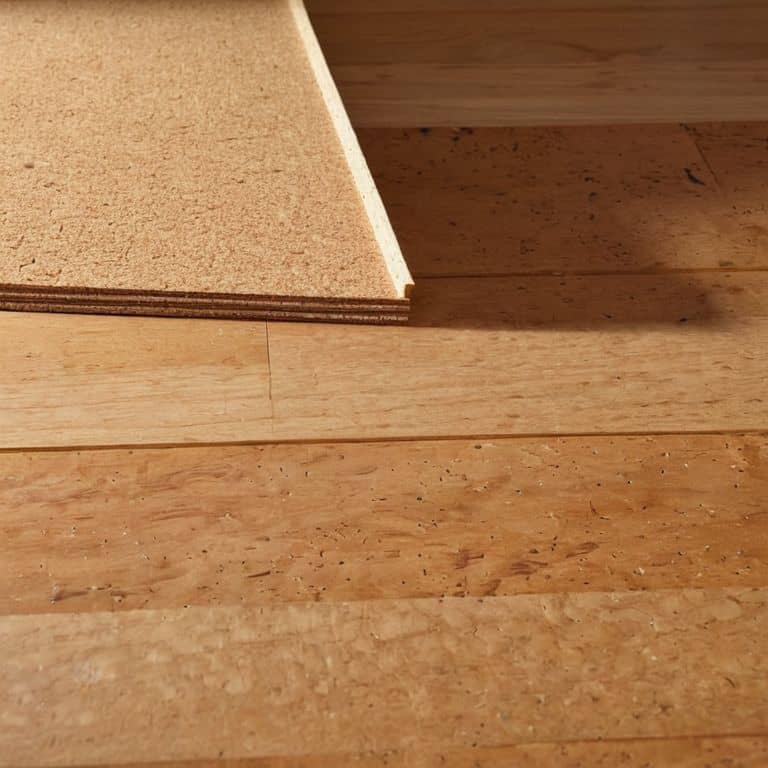
Laminate Floorings Best Friend Underlayment Options
When it comes to laminate flooring, having the right underlayment is crucial for a successful installation. I’ve found that a good underlayment can make all the difference in reducing noise and improving insulation, creating a more comfortable living space. As someone who’s passionate about upcycling vintage furniture, I appreciate the attention to detail that underlayment requires.
For laminate flooring, moisture-resistant underlayment options are a must. This ensures that the flooring remains stable and durable, even in areas prone to moisture. By choosing the right underlayment, you can enjoy your laminate flooring for years to come, and that’s a beautiful thing – almost as beautiful as a refurbished vintage armchair, if I do say so myself.
What Is Underlayment for Flooring
As I delve into the world of flooring, I’m reminded of my favorite DIY projects, where a dash of creativity and the right materials can transform a space. When it comes to underlayment materials for hardwood floors, it’s essential to choose the right one to ensure a smooth, durable finish. I recall a project where I used a combination of cork and foam underlayment to create a unique, eco-friendly floor that not only looked stunning but also provided excellent sound insulation.
In my experience, the best underlayment for laminate flooring often depends on the specific type of laminate and the subfloor conditions. For instance, if you’re dealing with a concrete subfloor, you’ll want to opt for an underlayment that provides adequate moisture protection. I’ve found that a thin layer of underlayment can make all the difference in preventing water damage and ensuring a long-lasting floor. When it comes to underlayment thickness for concrete subfloors, it’s crucial to strike the right balance between protection and budget.
As a creative workshop instructor, I’m always on the lookout for innovative diy underlayment installation tips to share with my students. One of my favorite hacks is to use a mix of recycled materials to create a unique underlayment that not only reduces waste but also adds a touch of personality to the floor. When it comes to underlayment cost and budgeting, it’s essential to consider the long-term benefits of investing in a high-quality underlayment, rather than opting for a cheap, short-term solution that may end up costing more in the long run.
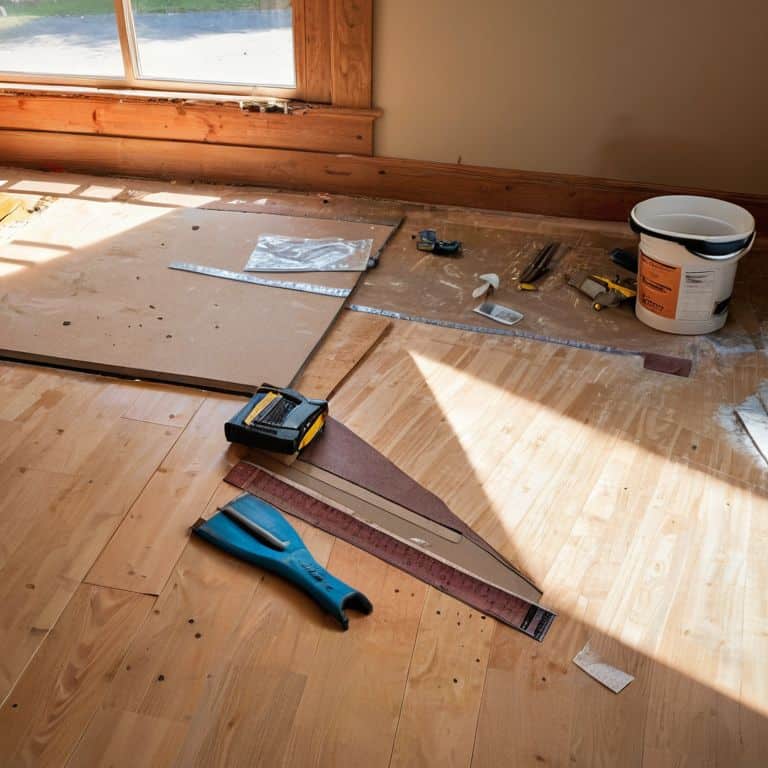
Diy Delights Underlayment Installation Tips and Cost
As I slip on my favorite pair of Van Gogh socks, I get ready to dive into the world of underlayment installation. One of the most crucial aspects to consider is the cost-effectiveness of the materials and labor involved. With a little creativity and some DIY magic, you can save a pretty penny and still achieve professional-grade results.
When it comes to installation, precision is key. Measure twice, cut once, and don’t be afraid to get creative with your underlayment layout to ensure a seamless fit. With the right tools and a bit of patience, you’ll be enjoying your newly renovated floors in no time.
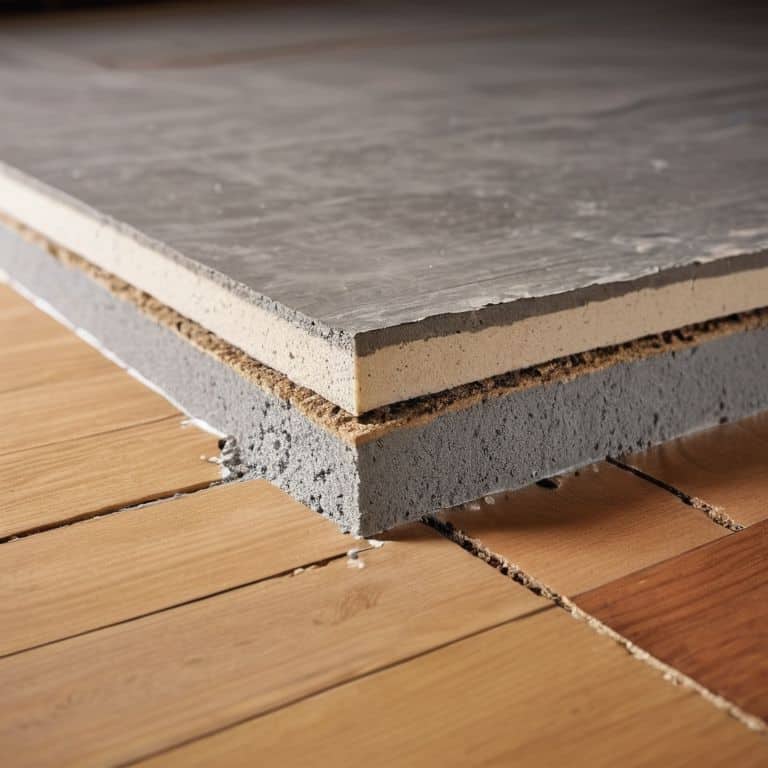
Thickness Matters for Concrete Subfloors and Tile
When it comes to concrete subfloors and tile, thickness is crucial for a successful installation. I’ve seen many a DIY enthusiast overlook this detail, only to be left with a floor that’s more uneven than a vintage chair leg. But, with the right underlayment, you can ensure a smooth, durable surface that’ll make your tile shine like a freshly polished vintage find.
For concrete subfloors, I always recommend opting for an underlayment that provides a decent amount of cushioning, as this will help absorb any imperfections in the subfloor. This not only ensures a more comfortable walking surface but also helps prevent damage to the tile itself, making it a vital consideration for any tile installation project.
Laying the Groundwork: 5 Essential Tips for Underlayment Success
- Choose the Right Underlayment Material: Don’t be afraid to get a little matchy-matchy – select an underlayment that’s specifically designed for your flooring type, whether that’s hardwood, laminate, or tile!
- Measure Twice, Cut Once: Ensure a snug fit by measuring your room and cutting your underlayment to size, leaving a little wiggle room for expansion and contraction
- Smooth Operator: Make sure your subfloor is as smooth as a summer breeze – fill in any gaps or cracks before laying down your underlayment to prevent unevenness and future headaches
- Moisture Misery: Don’t let dampness dampen your DIY spirits – use a moisture-resistant underlayment to protect your floors from water damage and warping, especially in areas prone to spills or high humidity
- Roll It Out: When installing underlayment, roll it out in the direction of your flooring to prevent air bubbles and wrinkles – and don’t forget to secure it with tape or staples to keep everything in place!
Key Takeaways to Revitalize Your Flooring
Choosing the right underlayment material can make all the difference in enhancing the durability and appearance of your floors, whether you’re working with hardwood, laminate, or tile
Understanding the importance of underlayment thickness, especially for concrete subfloors, is crucial for a successful and long-lasting flooring installation
By embracing the world of underlayment and its various options, DIY enthusiasts can not only elevate their flooring projects but also contribute to a more sustainable and creative approach to home renovation, much like upcycling vintage furniture into unique pieces of art
The Heart of the Matter
Underlayment for flooring is not just a practical necessity, but a creative canvas that lets you reimagine the foundation of your space, turning the ordinary into an extraordinary work of art, one layer at a time.
James O'Neill
Bringing it All Together: The Underlayment Story
As we’ve explored the world of underlayment for flooring, it’s clear that this often-overlooked component is actually the secret sauce that can make or break the success of your flooring project. From breathing life into hardwood with the right underlayment materials, to being the best friend of laminate flooring, the role of underlayment is multifaceted and crucial. We’ve also delved into the importance of thickness for concrete subfloors and tile, and shared some valuable DIY delights for underlayment installation tips and cost considerations.
So, as you embark on your own flooring adventures, remember that the journey to creating a space that’s truly yours is not just about the end result, but about the creative process itself. By embracing the art of underlayment and seeing the potential in every forgotten piece, you’re not only giving new life to old materials, but also contributing to a more sustainable and inspiring world, one floor at a time.
Frequently Asked Questions
What are the most common types of underlayment materials used for different flooring types?
My friend, let’s dive into the wonderful world of underlayment materials! For hardwood, plywood and oriented strand board (OSB) are popular choices. Laminate and engineered wood often pair well with foam underlayment, while cement-based underlayment is perfect for tile and concrete subfloors. Each has its own unique charm, just like my vintage furniture makeovers – and the right one can make all the difference!
How does the thickness of underlayment affect the overall durability and soundproofing of my floors?
The thickness of underlayment is like the secret ingredient in your favorite recipe – it makes all the difference! Thicker underlayment generally means better soundproofing and durability, but it’s all about finding the right balance for your floor type, my friend.
Can I install underlayment myself, or is it recommended to hire a professional for the job?
Installing underlayment yourself is definitely doable, but it depends on the complexity of the job and your DIY comfort level. If you’re handy and have a straightforward floor plan, go for it! However, if you’re dealing with a large or irregularly shaped space, it might be wise to call in a pro to ensure a smooth, even finish.