I still remember the first time I attempted to build a wooden chair, only to have it fall apart at the seams – literally. It was a harsh lesson in the importance of mastering a guide to woodworking joints. For years, I’ve heard people say that woodworking is all about precision and patience, but I’ve come to realize that it’s actually about understanding the art of connection. The way two pieces of wood come together can make or break a project, and it’s this delicate balance that I’m excited to share with you today.
As we dive into the world of woodworking joints, I want to assure you that this isn’t just another dry, technical guide. Instead, I’ll be sharing my personal experiences, tips, and tricks for bringing old charm to life through rustic yet radical joint-making techniques. You can expect to learn about the different types of joints, how to choose the right one for your project, and common mistakes to avoid. By the end of this article, you’ll be well on your way to creating stunning, one-of-a-kind pieces that showcase your unique style and flair. So, let’s get started on this joint venture, and I’ll show you how to turn your woodworking dreams into reality, one joint at a time!
Table of Contents
Guide Overview: What You'll Need
Total Time: 3 hours 45 minutes
Estimated Cost: $50 – $100
Difficulty Level: Intermediate
Tools Required
- Table Saw (for making precise cuts)
- Miter Saw (for angled cuts)
- Drill Press (for drilling accurate holes)
- Hand Saw (for cutting curves or small pieces)
- Clamp (for holding pieces together)
- Marking Gauge (for making consistent measurements)
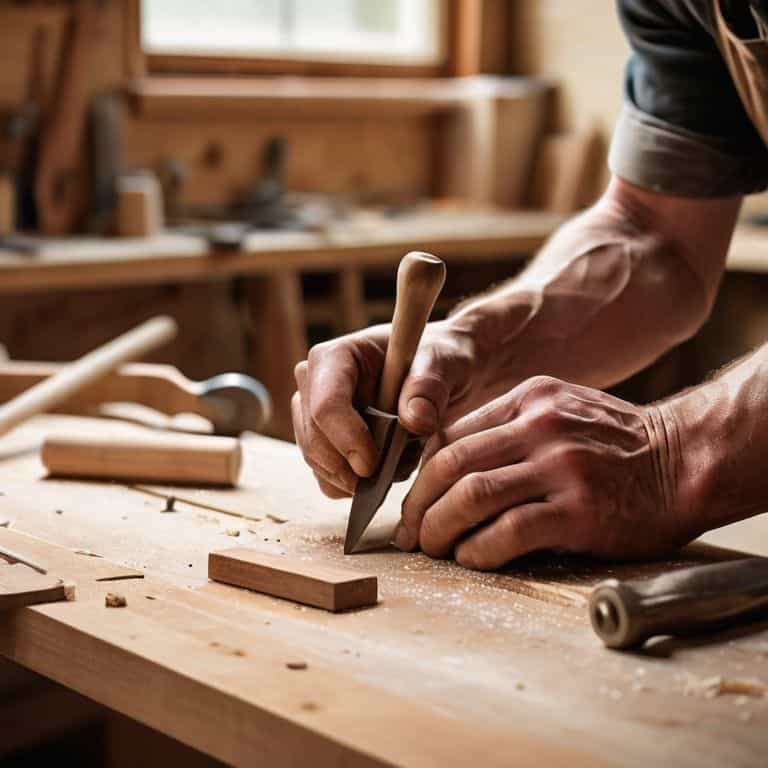
- Chisel Set (for removing small amounts of wood)
Supplies & Materials
- 2-in x 4-in lumber (for practice cuts)
- 3/4-in plywood (for making test joints)
- Wood Glue (for bonding pieces together)
- 2 1/4-in wood screws (for assembling joints)
- Wood filler (for filling gaps or holes)
- Sandpaper (for smoothing out wood surfaces)
Step-by-Step Instructions
- 1. First, let’s start with the basics of woodworking joints, understanding that they are the backbone of any furniture piece, providing the necessary strength and stability. To begin, gather your tools and materials, including a table saw, drill press, and a variety of woods to practice with. I like to wear my lucky Pablo Picasso socks for an extra burst of creativity.
- 2. Next, we’ll dive into the world of butt joints, which are the simplest type of joint and a great starting point for beginners. To create a butt joint, cut two pieces of wood to the desired length, then use a drill press to create pilot holes for the screws. Make sure the holes are countersunk to avoid any visible screws. As you work, remember to measure twice, cut once to avoid any costly mistakes.
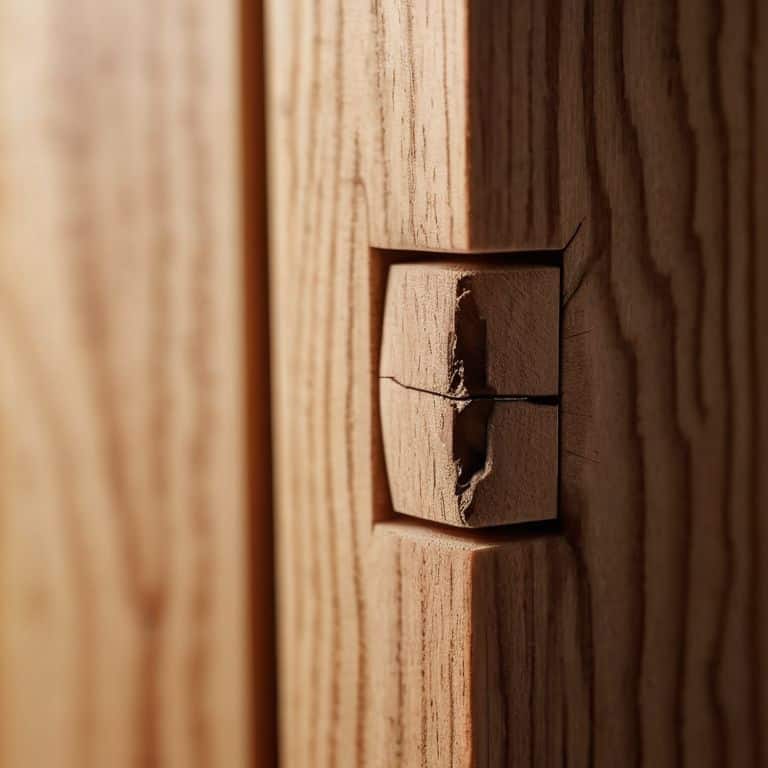
- 3. Now, let’s move on to the dado joint, a type of joint that involves cutting a slot in one piece of wood and a corresponding tongue on another. This joint is perfect for creating shelves or cabinets. To create a dado joint, use a table saw to cut the slot, then cut the tongue using a miter saw or a hand saw. Don’t forget to wear your favorite socks to keep you inspired and focused.
- 4. The dovetail joint is another popular type of joint that is known for its strength and beauty. To create a dovetail joint, use a dovetail jig to cut the tails and pins, then assemble the joint using glue and clamps. Remember to apply even pressure to ensure a strong bond. As you work, consider the aesthetic appeal of the joint and how it will enhance the overall look of your project.
- 5. In addition to these basic joints, it’s also important to understand how to reinforce them for added strength and durability. This can be done using a variety of methods, including screws, nails, or wooden dowels. When using screws, make sure to pre-drill the holes to avoid splitting the wood. For a more rustic look, consider using wooden dowels or pegs to add a touch of handmade charm.
- 6. Once you’ve mastered the basic joints, it’s time to move on to more complex projects, such as building a wooden cabinet or bookshelf. To start, create a detailed plan and cutting list, then begin assembling the pieces using the joints you’ve learned. Don’t be afraid to experiment and try new things – it’s all part of the creative process. As you work, remember to stay organized and keep your workspace clean to avoid any accidents or mistakes.
- 7. Finally, let’s talk about finishing touches, which can make or break the overall look of your project. Consider adding a stain or finish to protect the wood and enhance the color, then add any decorative hardware or trim. For a more whimsical touch, consider adding a unique handle or knob, such as an antique door handle or a piece of carved wood. As you put the final touches on your project, take a step back and admire your handiwork – you’ve earned it!
A Guide to Woodworking Joints
As I sit here, surrounded by my upcycled masterpieces, I’m reminded of the importance of understanding woodworking joint types. It’s not just about slapping two pieces of wood together; it’s an art form that requires patience, practice, and a dash of creativity. I like to think of it as a puzzle, where each joint is a unique piece that brings the entire picture to life. When working with different types of wood, it’s essential to consider the joint strength comparison to ensure your project can withstand the test of time.
One of my favorite things to do is to experiment with beginner-friendly woodworking projects that showcase various joint techniques. It’s amazing how a simple dovetail or mortise and tenon joint can elevate a piece from mundane to magnificent. By grasping the fundamentals of wood joint design principles, you’ll be able to create stunning pieces that are both functional and visually appealing. And, as an added bonus, you’ll be reducing waste and giving old materials a new lease on life.
As you embark on your woodworking journey, keep in mind that common woodworking mistakes are an inevitable part of the learning process. Don’t be discouraged if your first few attempts at creating a joint don’t turn out as planned. With time and practice, you’ll develop a keen eye for detail and a deeper understanding of woodworking joint terminology. Remember, the key to success lies in embracing the process, being patient, and having fun. Now, if you’ll excuse me, I have a date with a vintage dresser and a pair of socks featuring Van Gogh’s Starry Night – it’s going to be a match made in heaven.
Joint Strength Comparison Rustic Meets Radical
As I sit here, surrounded by my upcycled masterpieces and wearing my favorite Van Gogh socks, I’m reminded that joint strength is where the magic happens. When it comes to combining rustic and radical elements, it’s essential to consider the durability of each joint. I like to think of it as a beautiful balancing act between form and function. A well-crafted joint can elevate a piece from mere furniture to a work of art, don’t you think?
Let’s take a closer look at some of the most popular joints, shall we? From the sturdy mortise and tenon to the elegant dovetail, each has its own unique strengths and weaknesses. By understanding these differences, you’ll be able to make informed decisions about which joints to use in your own projects, and how to blend them in a way that’s both functional and visually stunning.
Wood Joint Design Principles for Beginners
As a beginner, it’s essential to grasp the fundamental principles of wood joint design. I like to think of it as the secret ingredient in your favorite recipe – it makes all the difference. When designing joints, consider the type of wood, the intended use of the piece, and the desired aesthetic. For instance, a sturdy mortise and tenon joint is perfect for a rustic coffee table, while a delicate dovetail joint might be more suited for a vintage-inspired dresser. My trusty sidekick, a pair of Van Gogh-inspired socks, always seems to spark creativity when I’m brainstorming joint designs.
By understanding these principles, you’ll be able to choose the right joint for your project, ensuring a sturdy and beautiful final product. Remember, practice makes perfect, so don’t be afraid to experiment and try out different joints until you find what works best for you. Happy building, and don’t forget to show off your unique creations – I’d love to see them!
Joint Genius: 5 Tips to Supercharge Your Woodworking
- Always prep your wood with a gentle touch, just like I prep my vintage furniture finds for a quirky makeover – it’s all about uncovering the hidden charm!
- Choose the right joint for the job, considering factors like weight, stress, and aesthetic appeal – my favorite socks, featuring Van Gogh’s swirls, always inspire me to think outside the box!
- Clamp it like you mean it, but don’t overdo it – a little patience and the right amount of pressure can make all the difference, just like when I’m carefully distressing a vintage door to create a one-of-a-kind piece
- Cutting corners might seem tempting, but trust me, precision is key when it comes to woodworking joints – take your time, and remember, practice makes perfect, just like when I’m perfecting my upcycling techniques
- Experiment with different types of wood and joint combinations to develop your unique style – and don’t be afraid to add a pop of color or a whimsical touch, just like my lucky striped socks bring a smile to my face as I work on a new project
Key Takeaways: Where Function Meets Fancy
Embracing the quirks of traditional woodworking joints can add a touch of whimsy to your modern DIY projects, making each piece uniquely personal and full of character
By understanding the principles of joint strength and design, you can confidently experiment with blending rustic elements with radical, contemporary flair, giving new life to forgotten treasures
Whether you’re a seasoned maker or a curious beginner, mastering the art of woodworking joints is all about having fun, being creative, and – of course – wearing your luckiest, most inspiring socks, like my own collection featuring famous artists
The Joint Journey
As we weave together the threads of tradition and innovation, remember that the true strength of a woodworking joint lies not just in its durability, but in the story it tells of the past, the present, and the possibilities that await us in the future.
James O'Neill
Bringing It All Together: A Whimsical Woodworker's Farewell
As we conclude this whimsical journey through the world of woodworking joints, let’s take a moment to reflect on the key takeaways. We’ve explored the wonderful realm of woodworking joints, from the basics to more advanced techniques, and discovered how to bring a touch of rustic charm to our creations. By mastering these joints and understanding their strengths, you’ll be well on your way to crafting unique, functional pieces that tell a story. Whether you’re a seasoned maker or just starting out, remember that the art of woodworking is all about experimentation, patience, and having fun with the process.
As you embark on your next project, I encourage you to think outside the box, or in this case, the woodshop. Don’t be afraid to push the boundaries of traditional woodworking and infuse your creations with a dash of personality. With every joint, every cut, and every finish, you’re not just building a piece of furniture – you’re crafting a piece of history. So, go ahead, get creative, and make it your own. And who knows, maybe one day you’ll be inspiring others with your unique brand of whimsy and woodworking wizardry, all while sporting your favorite lucky socks.
Frequently Asked Questions
What are the most essential woodworking joints for a beginner to learn?
For a beginner, I swear by the humble mortise and tenon, the sleek dovetail, and the trusty dado – these three amigos will get you building like a pro in no time, and they’re the perfect match for my Van Gogh socks, don’t you think?
How do I choose the right type of wood for a specific joint?
When selecting wood for a specific joint, consider the project’s purpose and desired aesthetic. For instance, sturdy oak is perfect for robust mortise and tenon joints, while versatile pine suits simpler dowel joints. My lucky Van Gogh socks are telling me to remind you: the right wood choice can make or break the joint’s integrity and visual charm!
Can I use power tools to cut and assemble joints, or are hand tools preferred?
Absolutely, my friend! Power tools can be a total game-changer for cutting and assembling joints. I personally love using my trusty circular saw and drill press to speed up the process. That being said, there’s still a time and place for hand tools – they offer a level of precision and intimacy that’s hard to replicate with machines, and I often find myself reaching for my chisel set to add those special touches.